Cutaway 00 with Arm Bevel:
Nov 3rd 2013
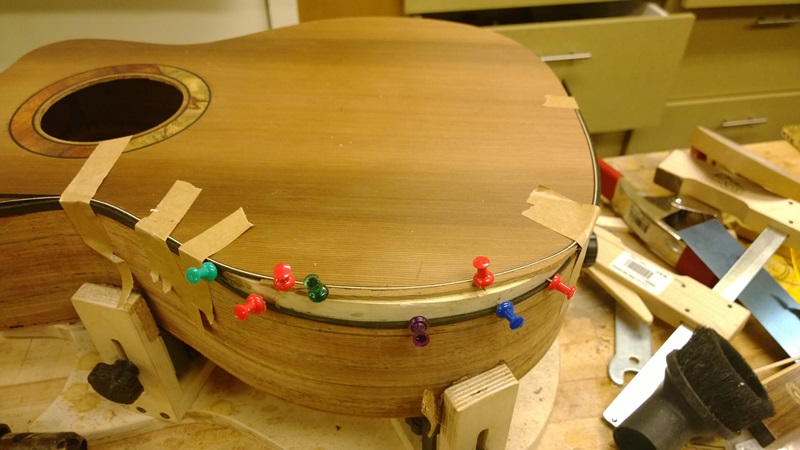
Here is the next step of dealing with the purflings and binding in this process. This is a dry test before I glue the stuff down shows how I glue the binding and purflings in the bevel.
The top strip of wood, the cutoff from making the top bevel, up to the bindings will get sanded away up to the purflings. Because of the angle of the bevel this will just be fill to back the ebony veneer.
The same with the bottom of the binding in the bevel. When the bevel is formed up to the rims, the remaining portion on the bindings will support the veneer. I had to sand the binding height down to get it to bend. I also let the bevel portion of the binding soak in super soft.
Looking at the picture, the binding could of had a purfling strip. You could see in the picture how that purfling strip would stay continuous.
Once this is all glued up, I will take a rasp and sand the basswood bevel support block, including the strip of ebony binding in the bevel and the cutoff holding in the purfling on top to form the bevel itself.
With the bevel shaped I will have a relatively flat oval shaped bevel outlined by the purfling on the top and the rim on the side. I will roughly cut a piece of veneer coat it with veneer glue and iron it on to the bevel. I will then cut and sand the veneer edges flush to the top and flush to the rim. Being ebony or any darker wood the veneer and the binding will blend together and I will end up with a clean purfling line on the top.
We will see!
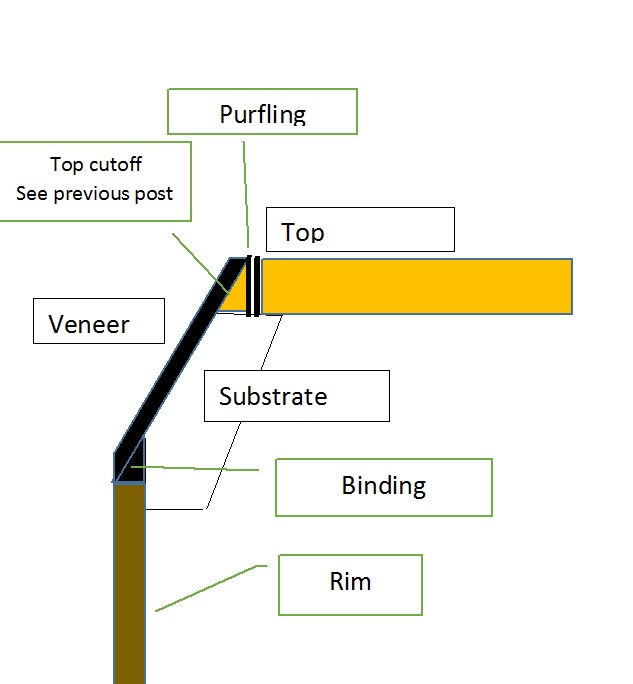
Here is a diagram that shows how the veneer will applied once the bevel is shaped.
Nov 3rd 2013
Sorry I have been traveling (sailing in the Grenadines :)), so it has been a bit since I have posted.
Here is the completion of the bevel.
I used rasps, sand paper and a scrapper to shape the bevel. Here it is really important to get the edges of the bevel next to the top purfling and the rims sanded straight like in the diagram in my previous post. (do not ask me how I know this or how many tried it took before I learned it.) There is a danger of rounding over the edge of the bevel on top. This will be bad as you will remove the veneer when scraping it level to the top.
.jpg)
You can loosely cut the veneer, I used a veneer heat set glue to coat each surface and let it dry. Many other types of glue will work.
.jpg)
I used an iron to set the veneer to the bevel. After a couple of hours I hit the edge of the bond all around with CA to really lock the edge.
.jpg)
I used a sharp scrapper flush with the top and flush the rims to trim the veneer. (look for the diagram in my previous post to see how the veneer will be trimmed.
.jpg)
Easy as pie! (not really. There was a bit of learning, but with a heat sensitive glue and a large sheet of veneer I got to try it a few times to get it right.
.jpg)
Nov 24rd 2013
Making iron on veneer is handy, but I need to mention one important safety note: Do not use your spouse's iron for this procedure.
I also finished up binding the guitar. Making the bindings for the cut-away is hard. I tried using the fox style bending machine, and bent them ok. But I could not get then out of the unit without the spring steel blowing them up. I tried some tricks to hold the spring steel without success. I finally pulled out my bending iron and did them by hand. Boy those are tight curves. I practiced on the pieces I blew up in the bender. I learned a bunch about using the bending iron. Also by hand I was able to get bindings that matched the curve and held their shape.
.jpg)
.jpg) Next Page
Next Page
| 